
Response
Overview
The Response tab is where you record incident times, apparatus and crew details, and track REHAB status. The Response tab includes the following sections:
Disclaimer
NERIS is currently under development by the Fire Safety Research Institute (FSRI). This guide reflects the system as implemented in EPR FireWorks. Functionality may evolve as NERIS continues development toward full national implementation by January 2026.
Times
The Times section captures essential timestamps during an emergency response, forming the foundation for NERIS incident reporting and analytics. Timestamps are organized into two subsections: Dispatch Summary and Incident Summary, ensuring a comprehensive timeline of response activities. These fields are typically imported from a Computer-Aided Dispatch (CAD) system or entered manually.
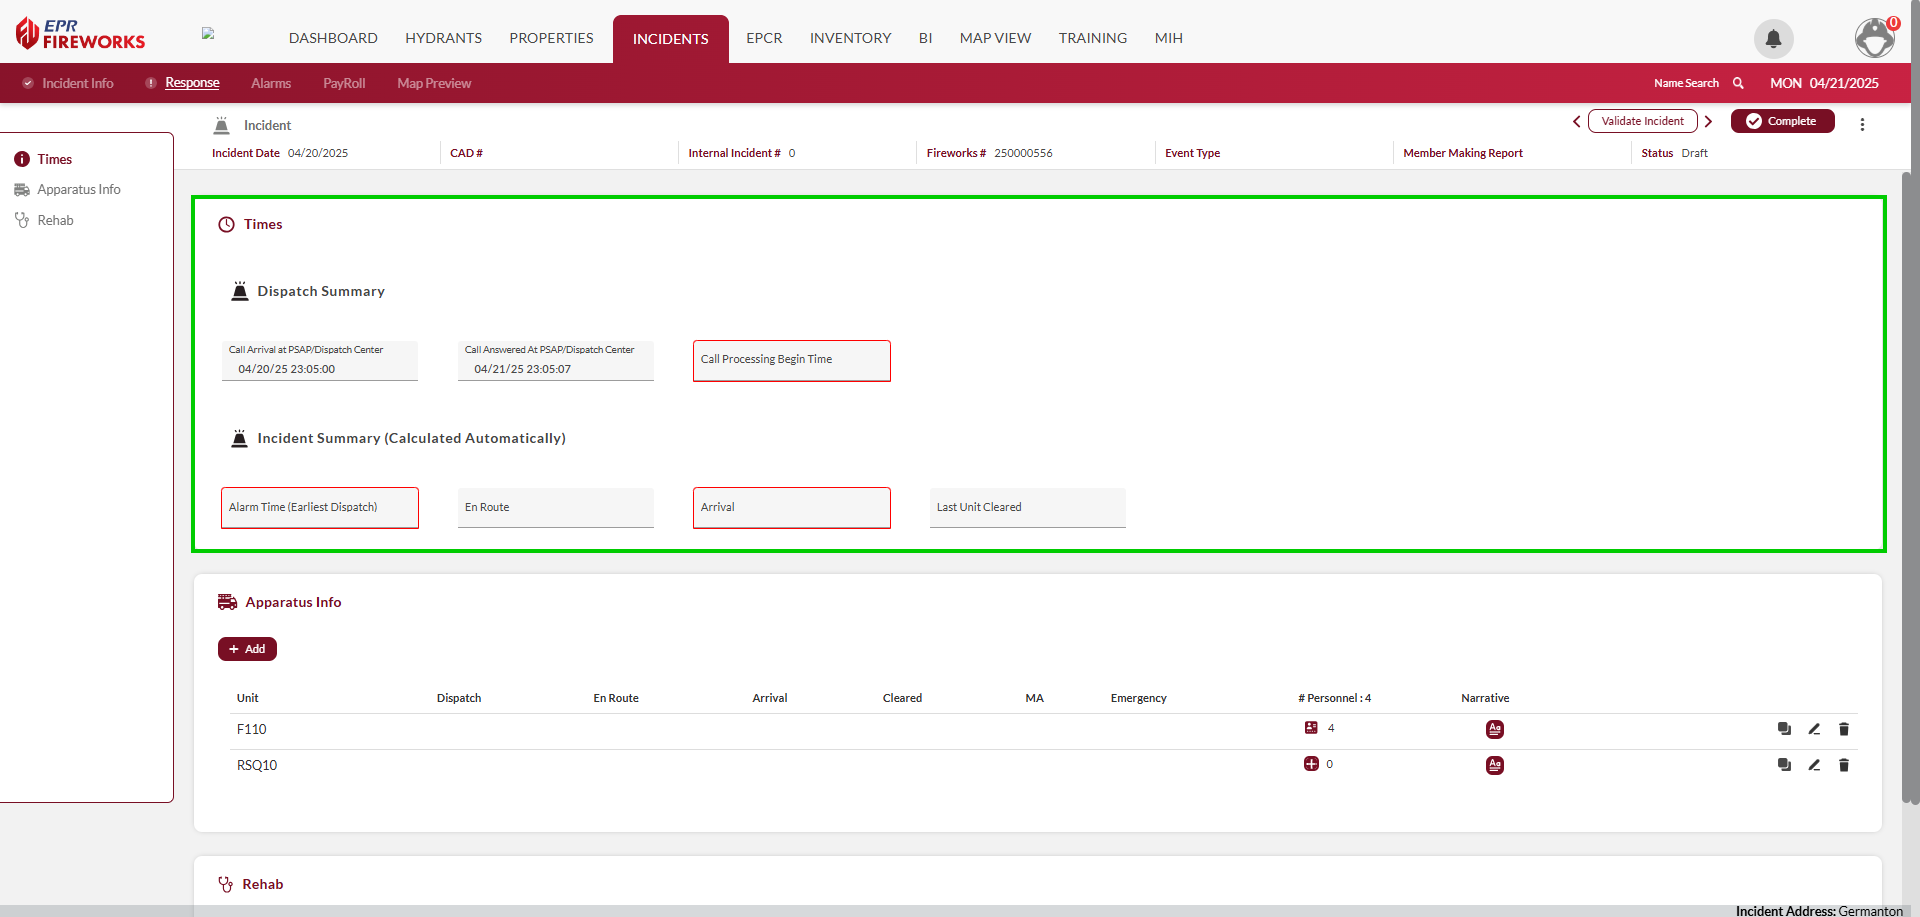
Dispatch Summary
This subsection logs critical dispatch-related timestamps, which are vital for documenting response efficiency.

Field | Description |
|---|---|
Call Arrival at PSAP/Dispatch Center | Time when the initial emergency call reaches the Public Safety Answering Point (PSAP) or dispatch center. |
Call Answered At PSAP/Dispatch Center | Time when a dispatcher answers the emergency call at the PSAP or dispatch center. |
Call Processing Begin Time | Time when call information is processed for dispatch to response units. |
Incident Summary
The Incident Summary provides metrics automatically calculated based on unit timestamps, offering an overview of the incident timeline.

Field | |
|---|---|
Alarm Time (Earliest Dispatch) | Time when the first unit is dispatched to the incident. |
En Route | Time when the first unit begins traveling to the scene. |
Arrival | Time when the first unit arrives on scene. |
Last Unit Cleared | Time when the final unit leaves the scene. |
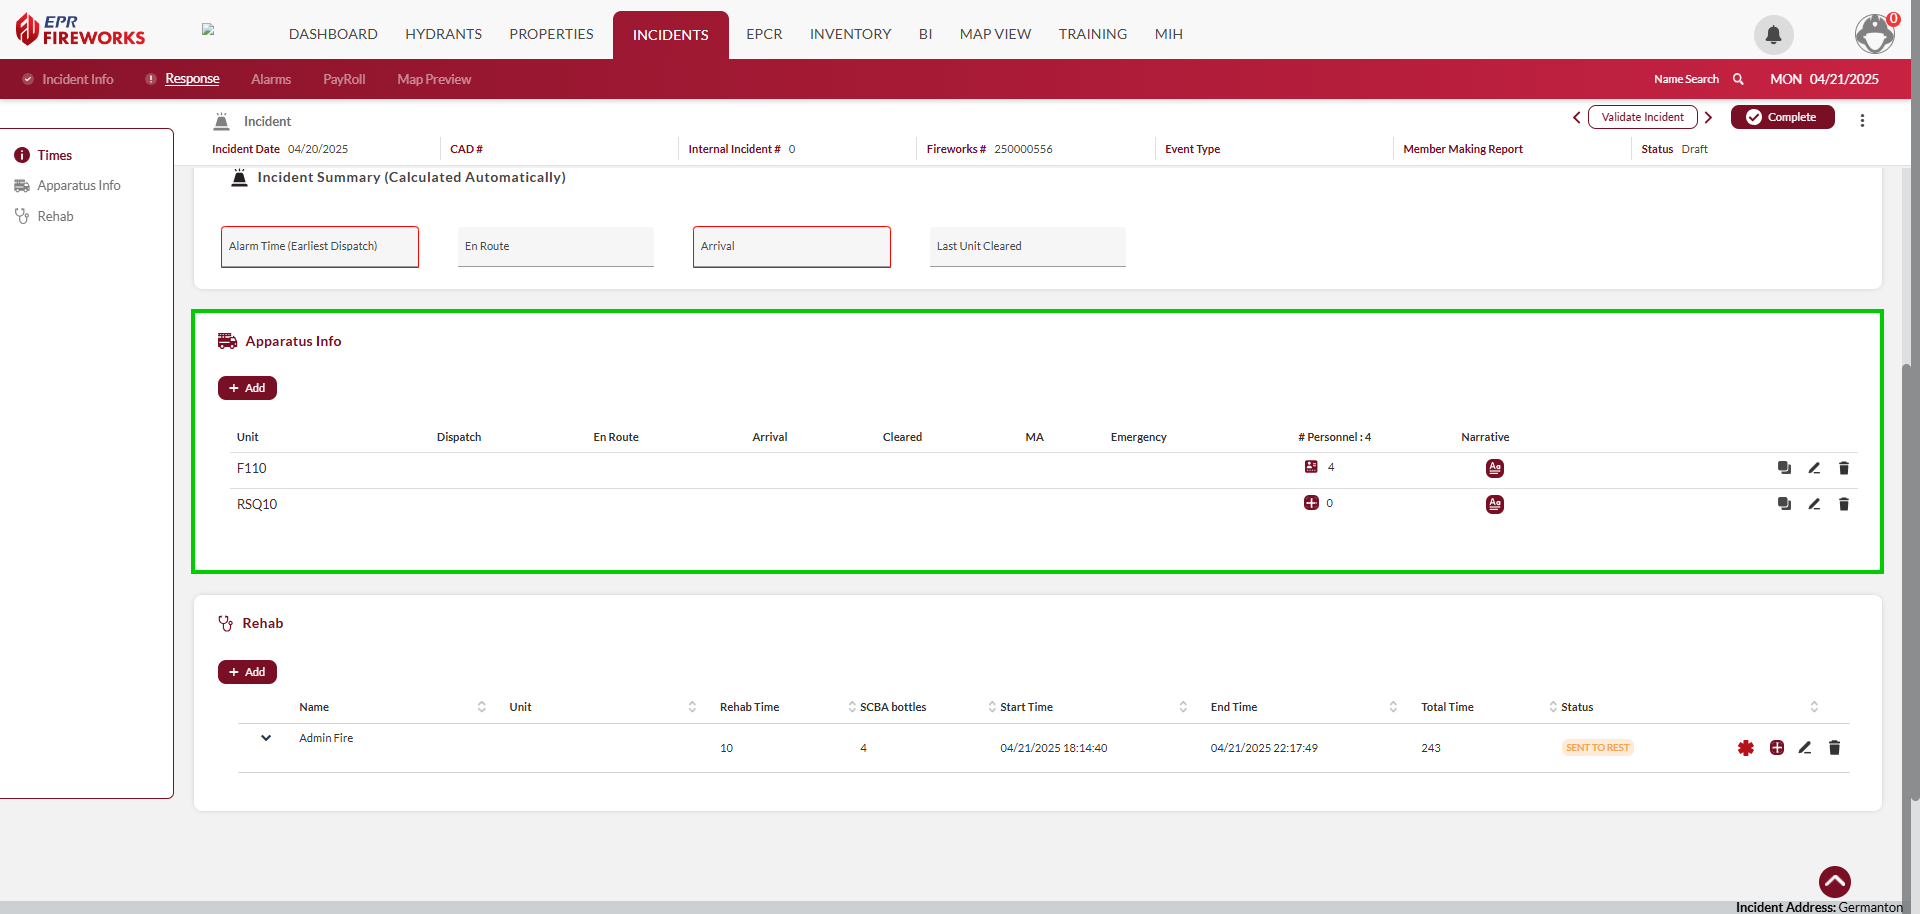
Apparatus Info
Apparatus Info
The Apparatus Info section captures details about response vehicles and their crews, enabling accurate tracking of resources deployed during an incident. This section supports resource allocation analysis and ensures compliance with NERIS reporting standards by logging unit activities and personnel assignments. Selecting a unit (e.g., RSQ10) opens a detailed view with timestamps, identifiers, and response details, which may indicate Mutual Aid if the unit is from another department. The summary view includes the # of Personnel field, with detailed personnel assignments available in the Personnel subsection below.
To add an apparatus to the incident, do as follows:
In the Apparatus Info section, click Add.

The Unit sidebar will open on the right. Select the Apparatus ID from the list
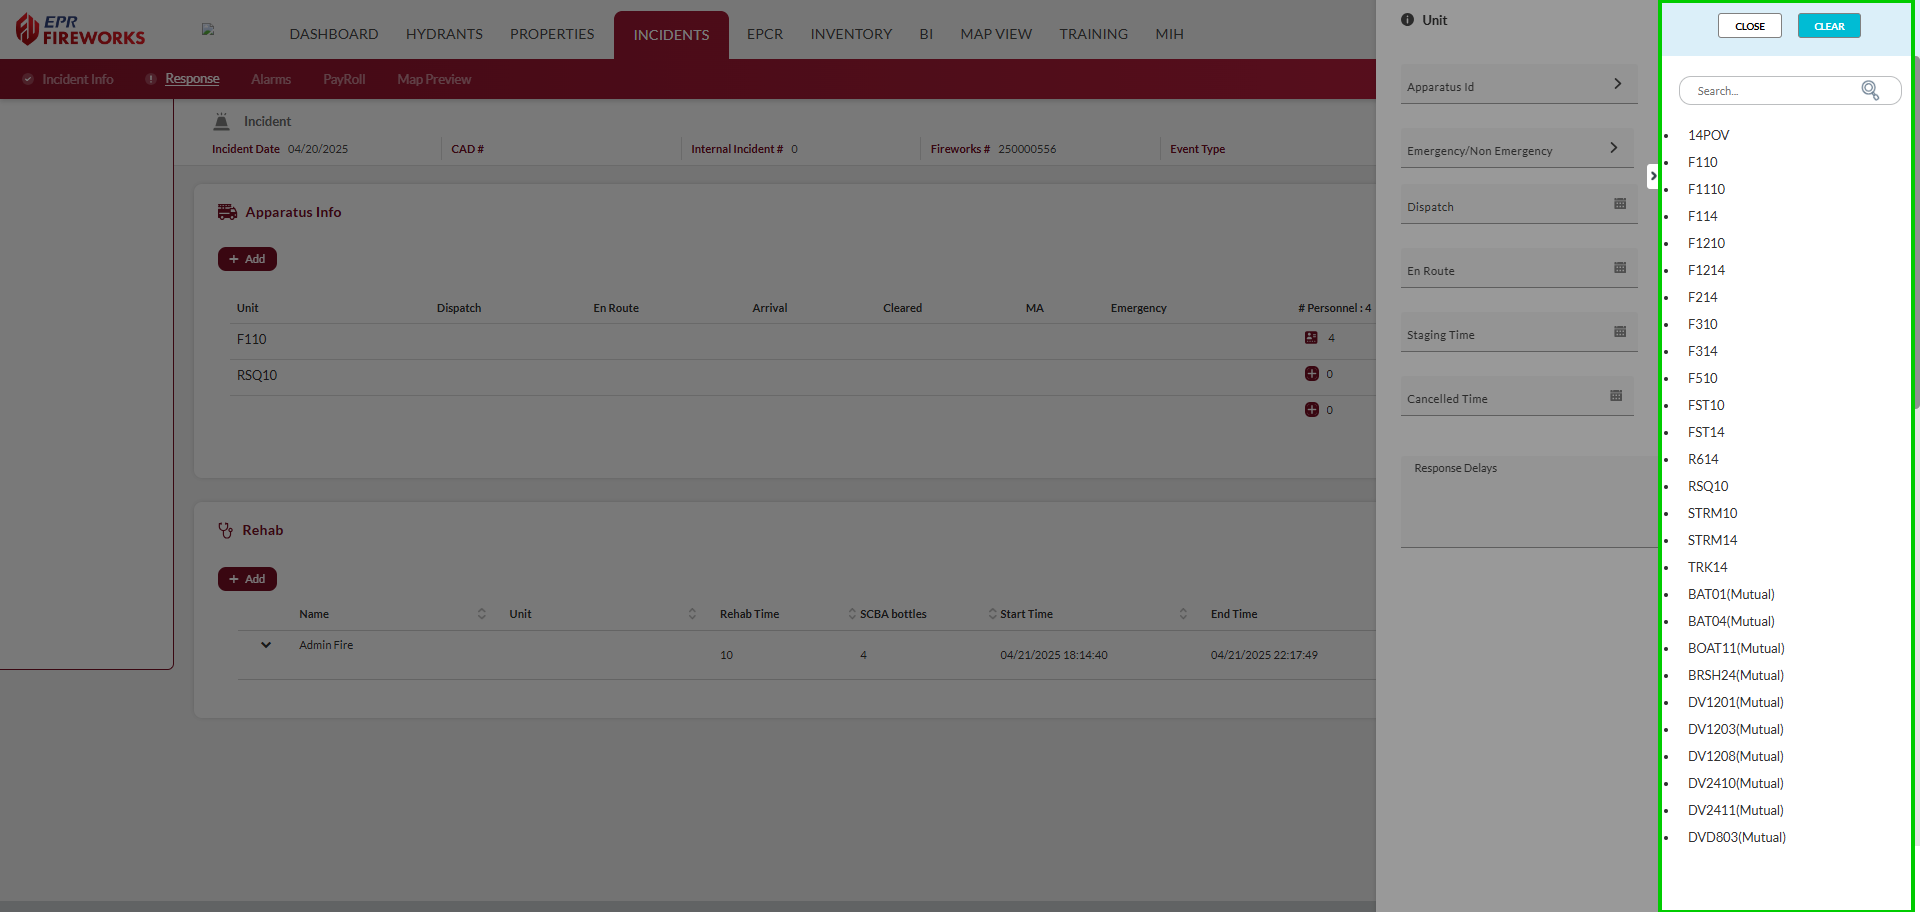
Complete the fields according to the table below.
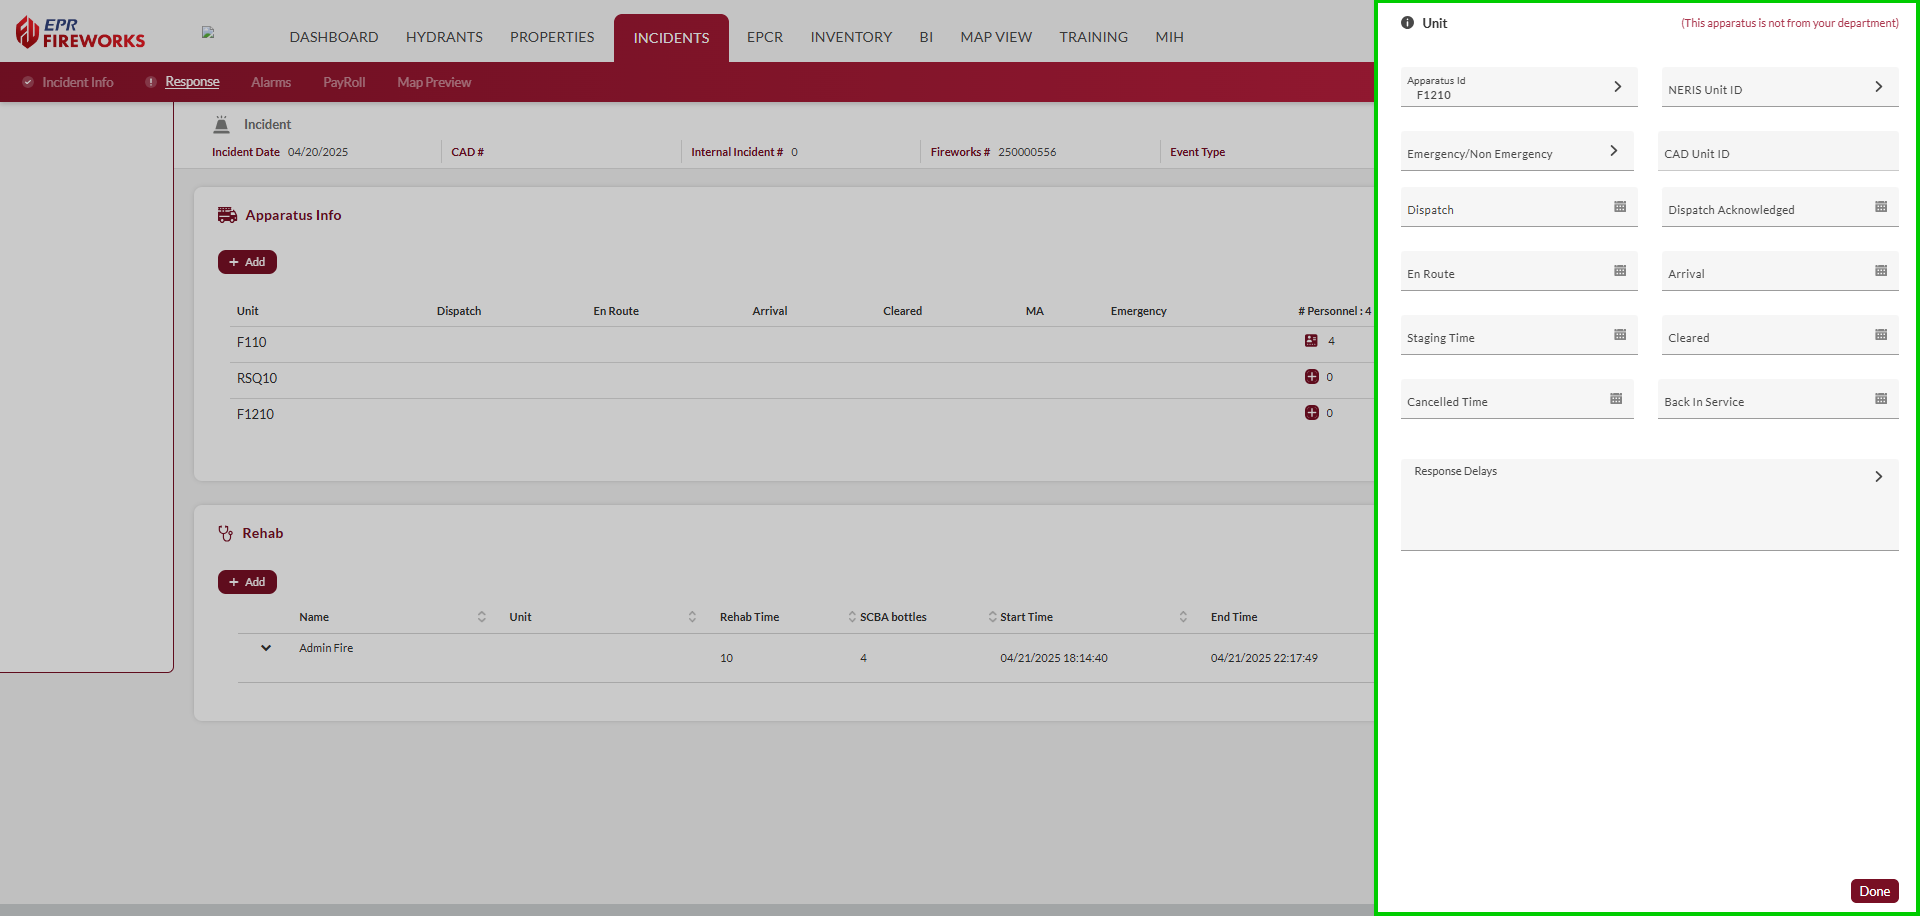
When finished, click Done. The apparatus details will appear in the Apparatus Info table.
Enter the apparatus narrative:
In the apparatus row, under Narrative, click the icon.
Add additional details in the Apparatus Narrative.
Note:You can generate a narrative from the apparatus details by clicking Generate.
To add timestamps to the narrative, click Add Time Stamp.
Field | Description |
|---|---|
Apparatus ID | Unique identifier for the response vehicle, assigned by the system (e.g., RSQ10). |
NERIS Unit ID | Unique identifier assigned by NERIS for national reporting and interoperability. |
Emergency/Non-Emergency | Indicates whether the unit is responding in Emergency mode (e.g., with lights and sirens) or Non-Emergency mode. |
CAD Unit ID | Identifier assigned by the Computer-Aided Dispatch (CAD) system for integration purposes. |
Dispatch | Time when the unit is dispatched to the incident. |
Dispatch Acknowledged | Time when the unit acknowledges the dispatch, confirming receipt of the call. |
En Route | Time when the unit begins traveling to the scene. |
Arrival | Time when the unit arrives on scene. |
Staging Time | Time when the unit is staged, awaiting further instructions before proceeding to the scene. |
Cleared | Time when the unit is cleared from the scene. |
Cancelled Time | Time when the unit’s response is cancelled, if applicable. |
Back in Service | Time when the unit is back in service and available for another call. |
Response Delays | Factors causing delays in the unit’s response. |
Personnel
The Personnel icon in the apparatus row displays the number of responders assigned to a given apparatus. Clicking the icon opens a sidebar on the rig that providesng detailed information for each responder. This includes individual roles, response types, and activity timestamps, ensuring precise documentation of crew involvement during the incident.

Only responders properly assigned to apparatuses are eligible for Payroll.
To add personnel to an apparatus, do as follows:
In the apparatus row, under personnel, click +. The personnel sidebar will open on the right.
For each responder, complete the fields according to the table below.
When finished, click Done.
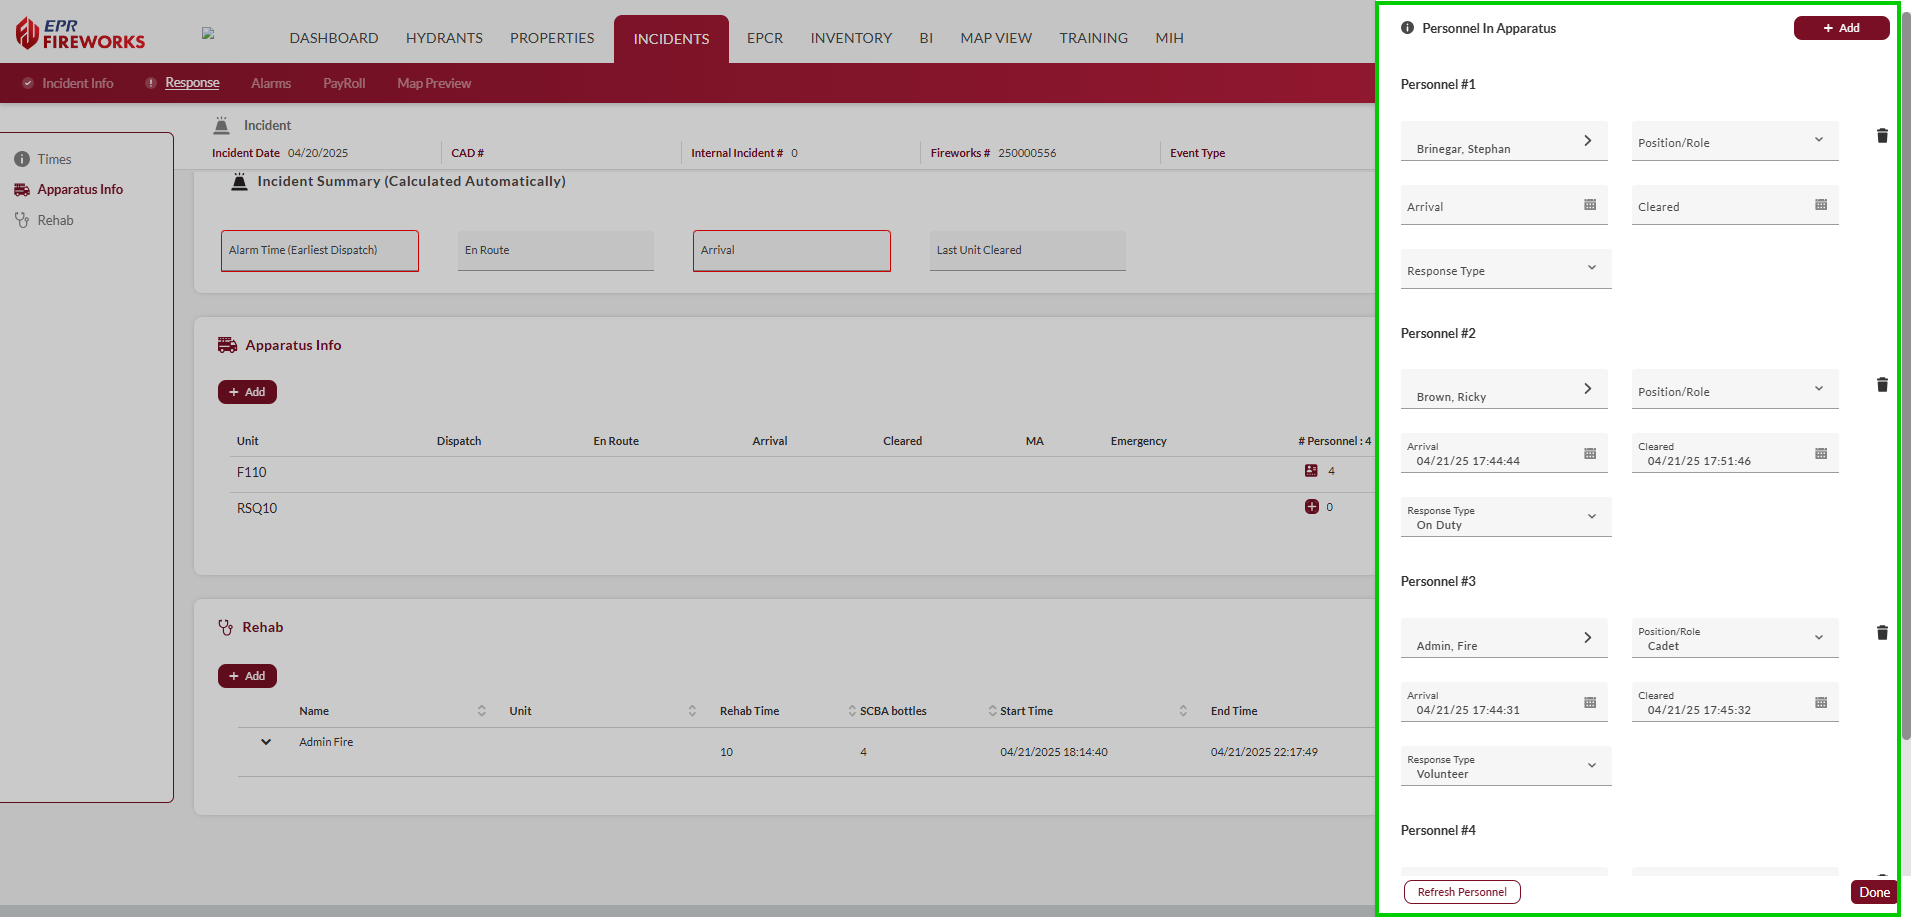
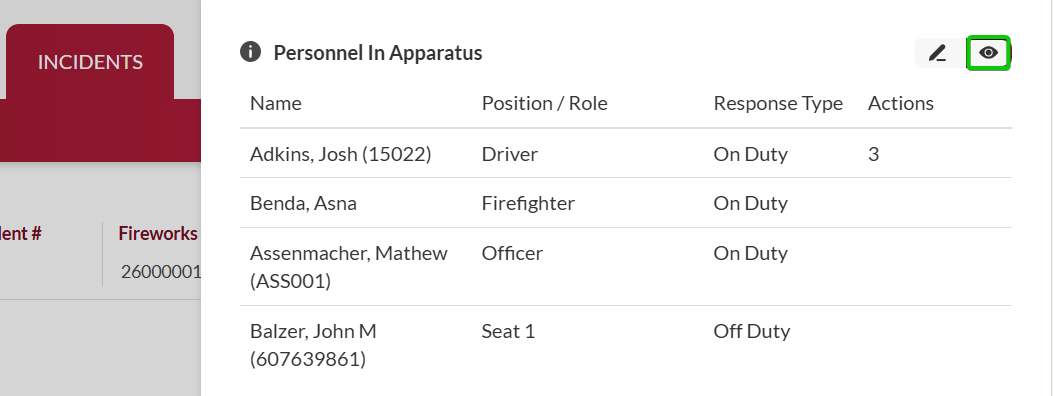
Note: Toggle between detailed personnel forms and a summary list view when managing apparatus personnel. The summary view displays all crew members with their name, position, response type, and actions in a single table, allowing you to verify assignments quickly.
Field | Description |
|---|---|
Name | Name of the responder assigned to the unit. |
Position/Role | The responder’s role or position during the incident (e.g., Firefighter, Paramedic). |
Arrival | Time when the responder arrived on scene with the unit. |
Cleared | Time when the responder is cleared from the scene. |
Response Type | Type of response for the responder (e.g., Emergency, Non-Emergency). |
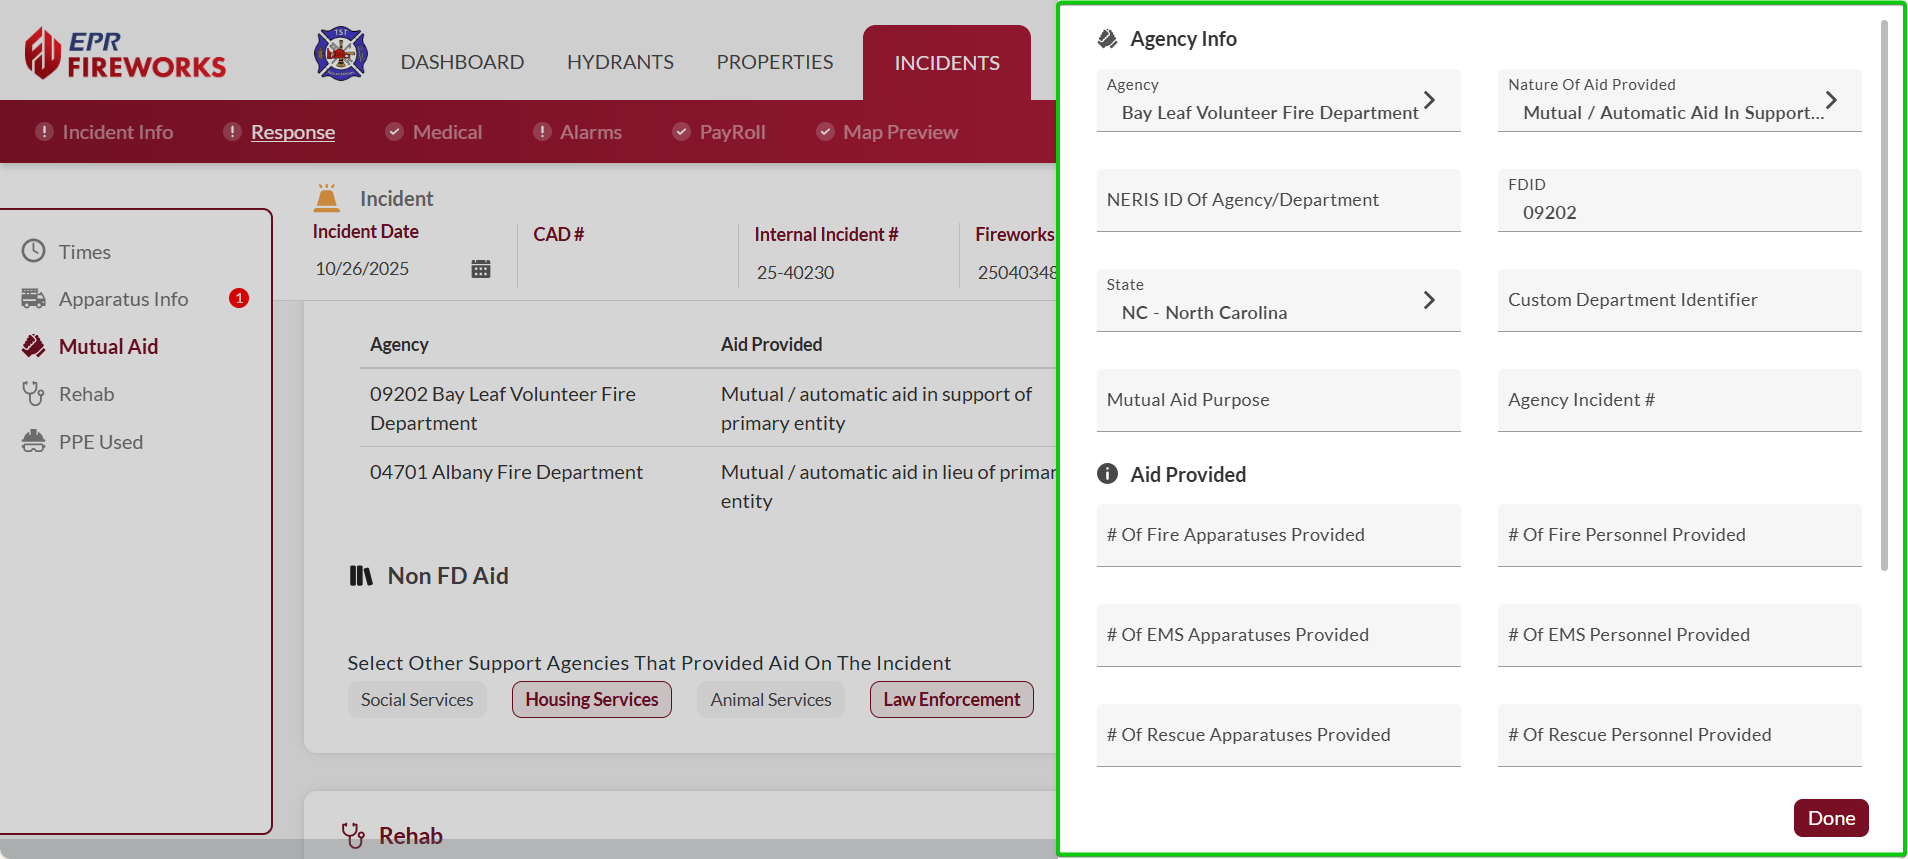
Mutual Aid
The Mutual Aid section tracks mutual aid fire departments and additional services (e.g., social services, housing services, animal services, and law enforcement) that were active on the scene. Each aid service category is tracked in a designated subsection:
Agency List
Non FD Aid
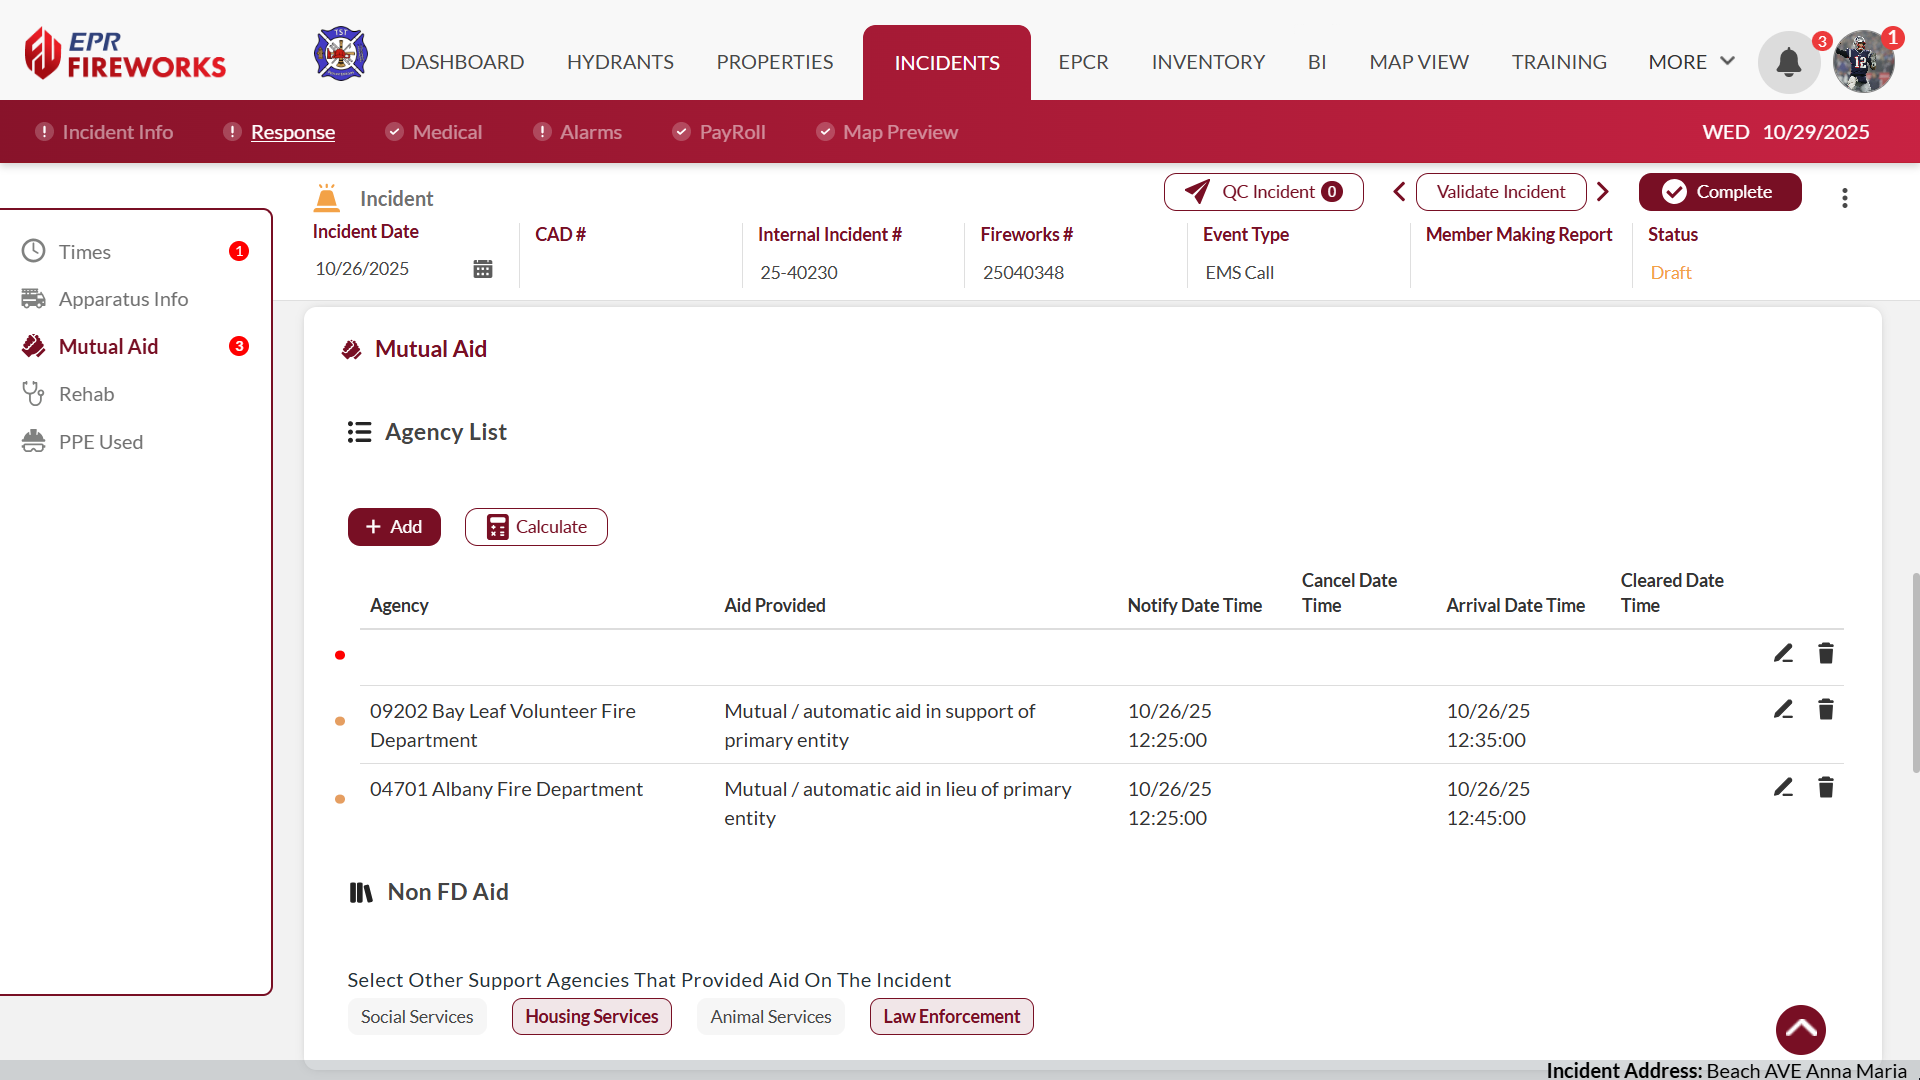
Note: The Agency List subsection will only appear if the Aid Given or Received in Incident Info > General is set to Aid Given or Aid Received. The Non-FD Aid subsection appears regardless of this setting.

To add mutual aid agencies, do as follows:
Scroll to Mutual Aid.
Add mutual aid fire departments and EMS agencies:
In the Agency List subsection, click Add.

In the sidebar, complete the details of the aid agency.
Close the sidebar to save changes.
In the Non FD Aid subsection, select the additional support services involved in the incident.

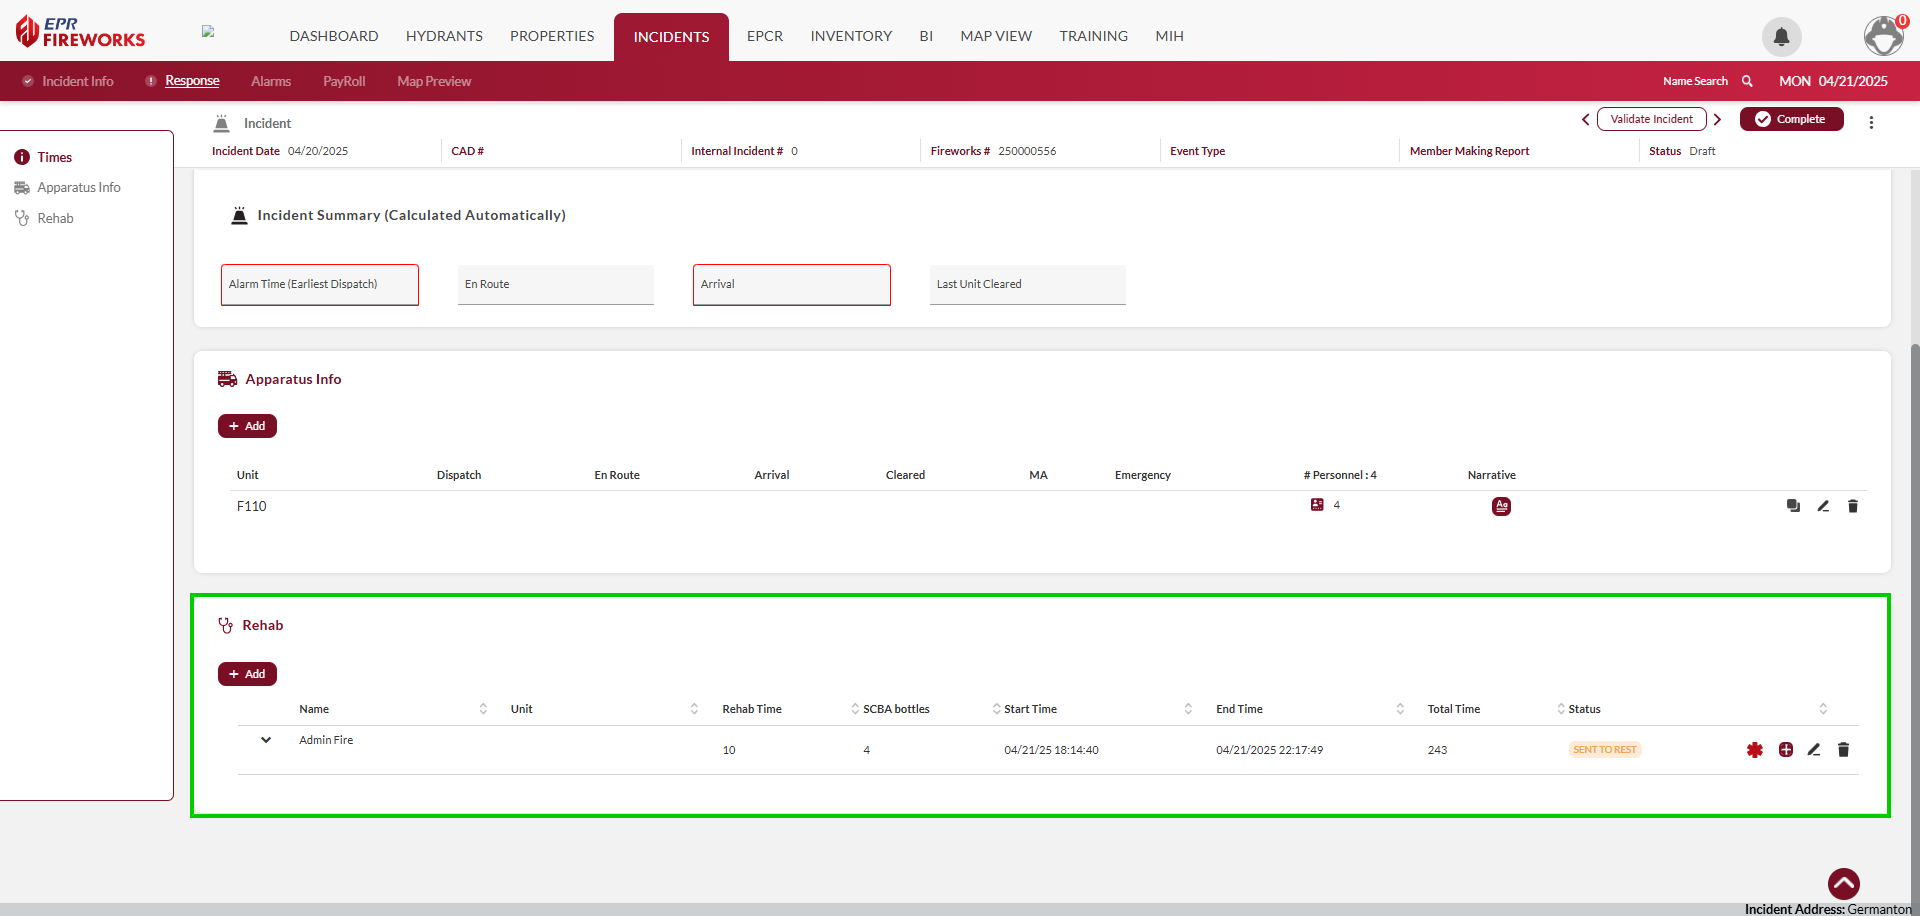
REHAB
The REHAB section monitors responders' rehabilitation status, ensuring their health and safety during prolonged incidents in compliance with NFPA 1584 standards. This section provides a summary view of responder details, rehabilitation duration, and equipment usage. After clicking + Add, a detailed form (REHAB Check Details) allows for additional data entry, including vital signs and check status.
Adding Rehab Checks
For each responder undergoing Rehab, complete the check details as follows:
Click + Add. The Rehab Check Details form will open to the right.

In the Check Details sidebar, complete the fields as follows (see the tables below for field descriptions):
Enter basic details: Name, Unit, # of SCBA Bottles, Provider, and Check Time.
Record vital signs if applicable (e.g., BP, HR, RR, SpCO, SpO2, Temp, Skin).
Add additional observations in the Narrative field.
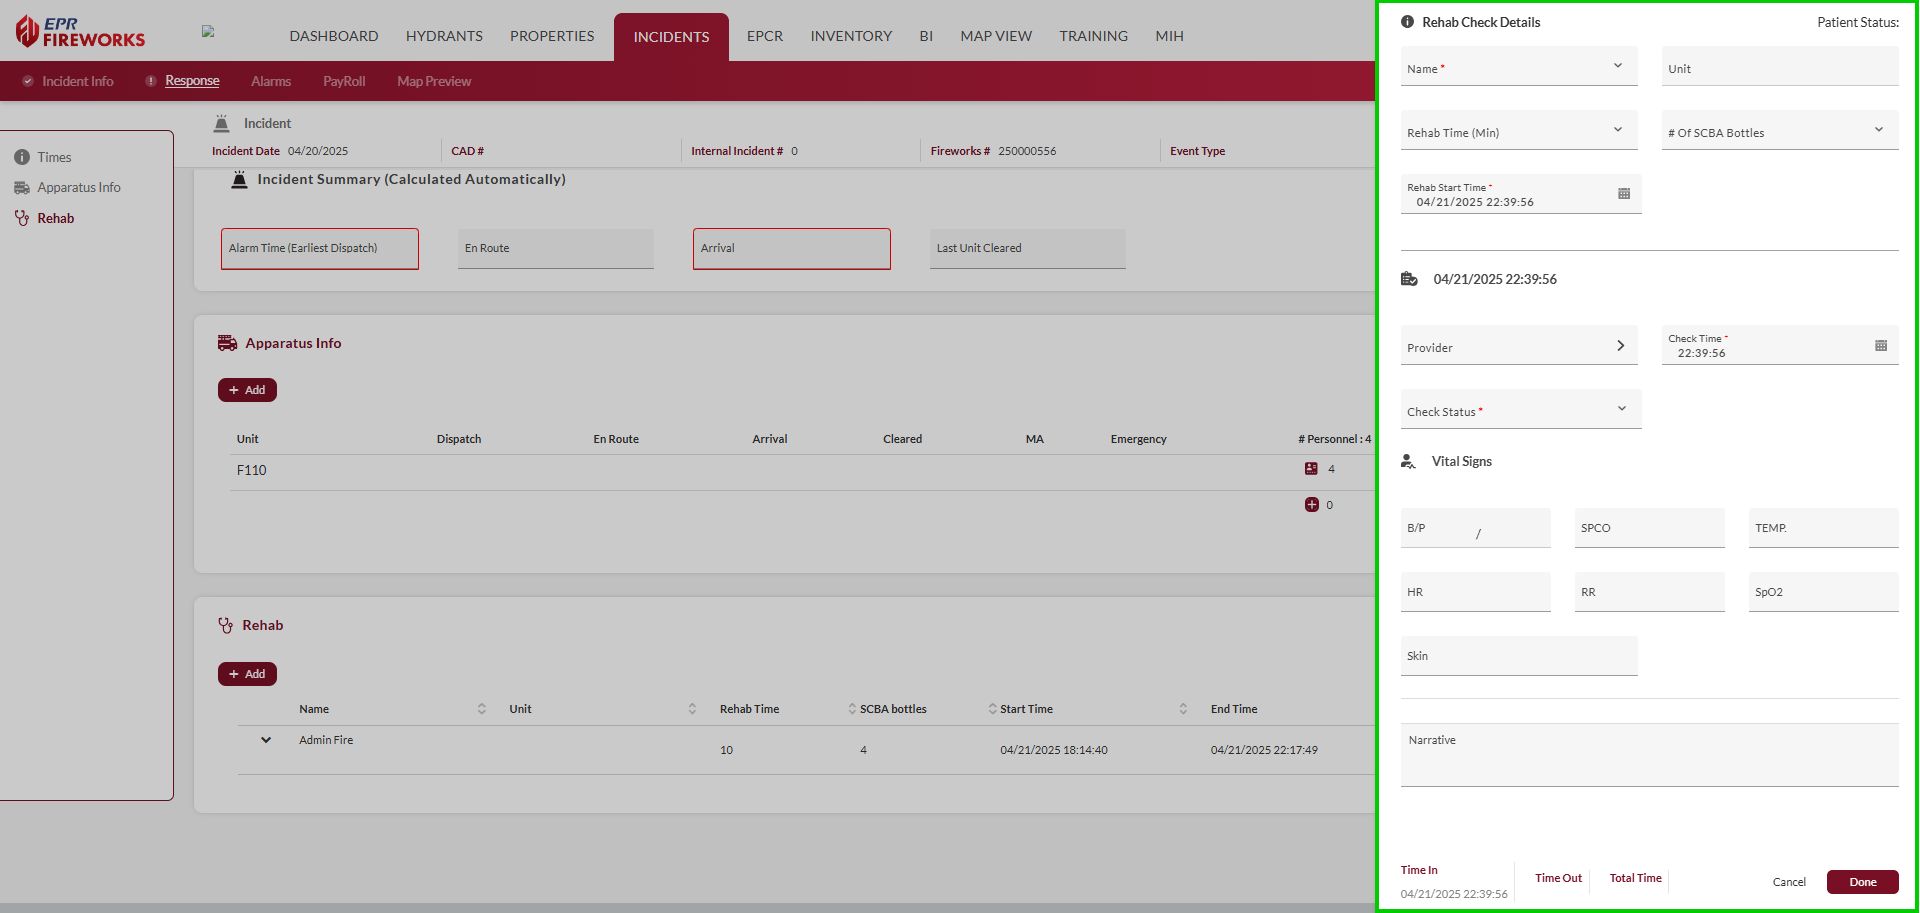
When finished, click Done. The Rehab row will update with Name, Unit, Rehab Time (Min), # of SCBA Bottles, Rehab Start Time, and End Time (from Time Out).

Rehab Check Details Key
Field | Description |
|---|---|
Name | Name of the responder |
Unit | Unit identifier for the responder’s assigned vehicle |
Rehab Time (Min) | Total duration of the rehabilitation period, displayed in minutes |
# of SCBA Bottles | Number of Self-Contained Breathing Apparatus (SCBA) bottles used by the responder. |
Rehab Start Time | Time when the responder enters rehabilitation |
Provider | Name or identifier of the medical provider conducting the rehab check |
Check Time | Time when the rehab check is performed |
Check Status | Status of the rehab check (e.g., Cleared, Sent to Rest, Transported) |
BP | Blood pressure of the responder (systolic/diastolic) |
SpCO | Carbon monoxide level in the responder’s blood (percentage) |
Temp | Temperature of the responder |
HR | Heart rate of the responder (beats per minute) |
RR | Respiratory rate of the responder (breaths per minute) |
SpO2 | Oxygen saturation level in the responder’s blood (percentage) |
Skin | Condition of the responder’s skin (e.g., Normal, Pale, Sweaty) |
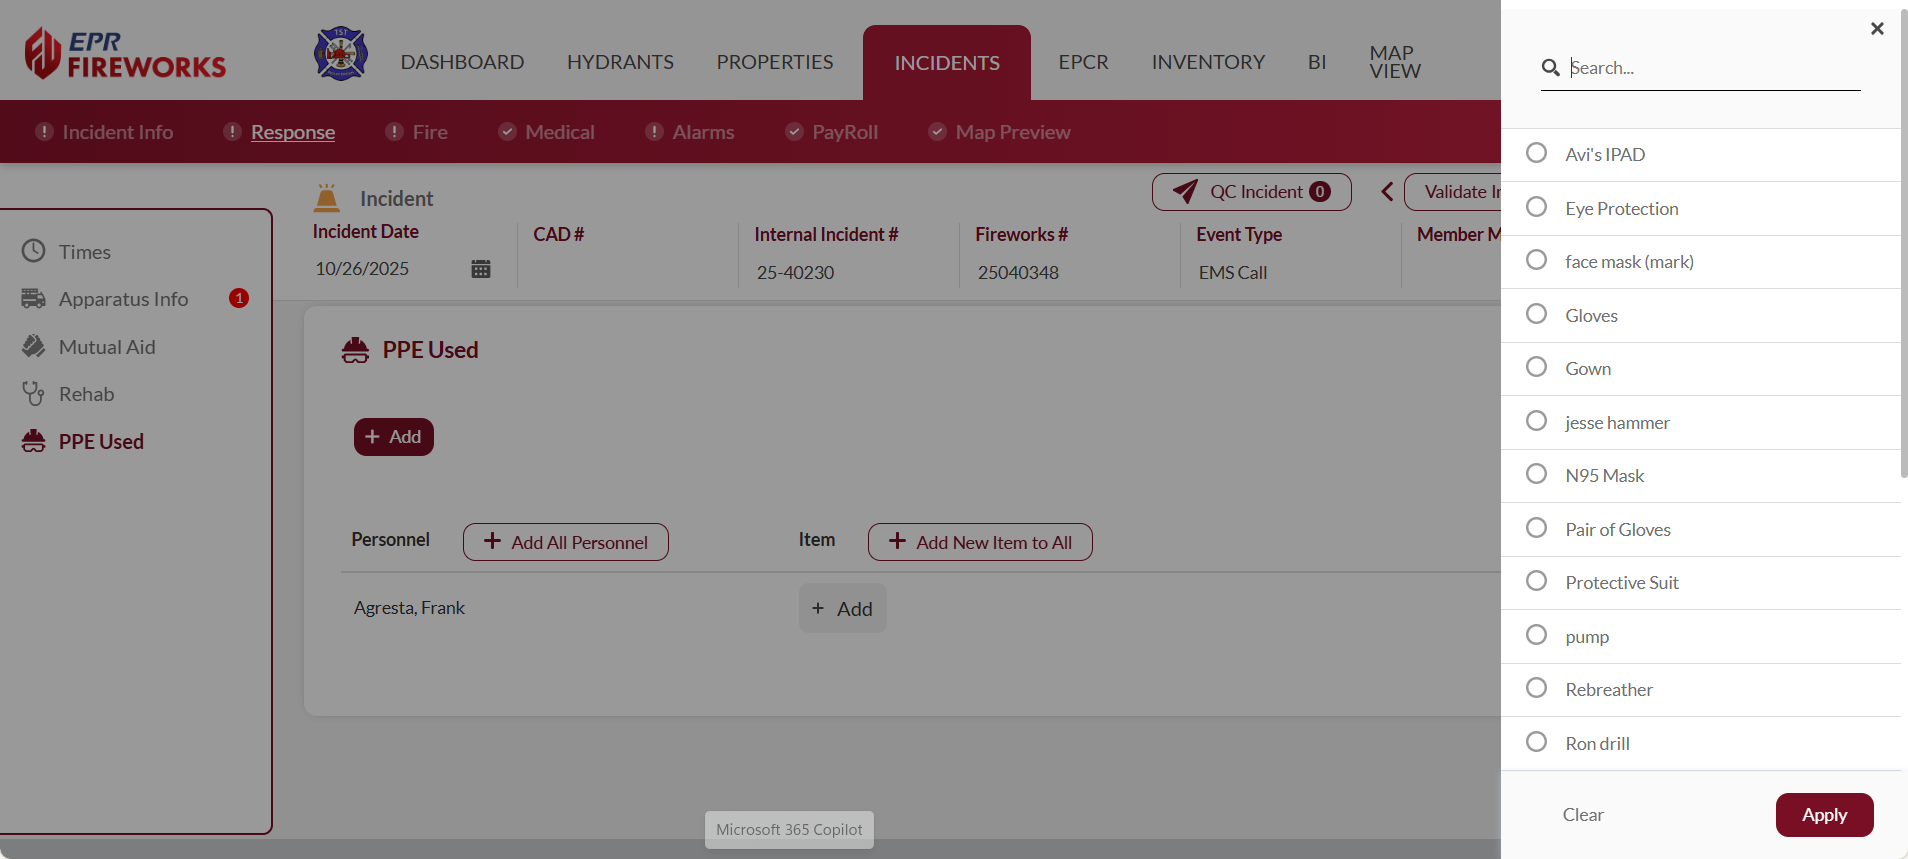
PPE Used
Add details regarding PPE used by personnel during the incident:
Before You Start
Ensure you added personnel to the apparatuses involved in the incident. If you did not select personnel, the PPE Used section will not function.

Scroll to PPE Used.
Add staff members to the table:
Click Add.
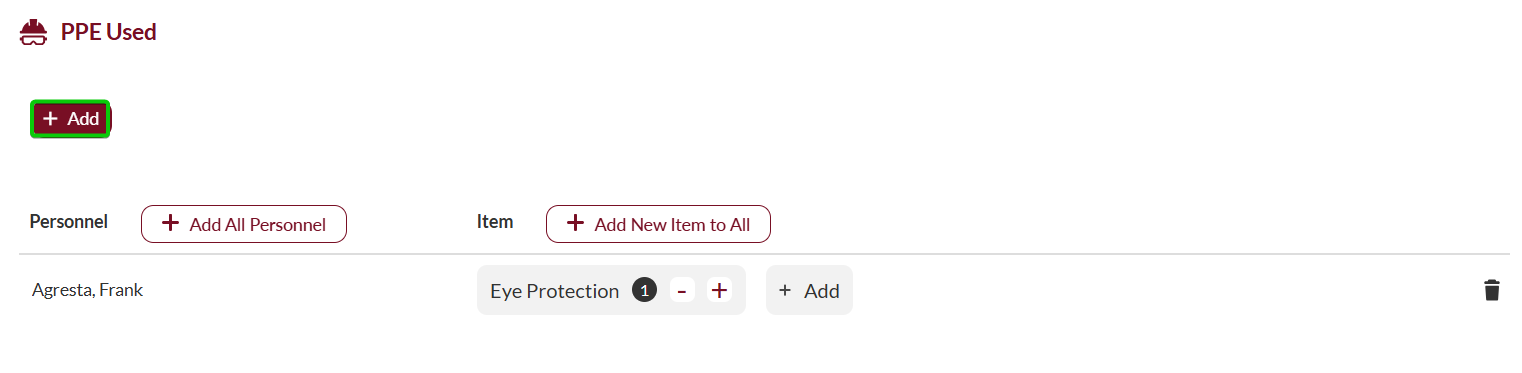
Select all participating staff members from the sidebar.
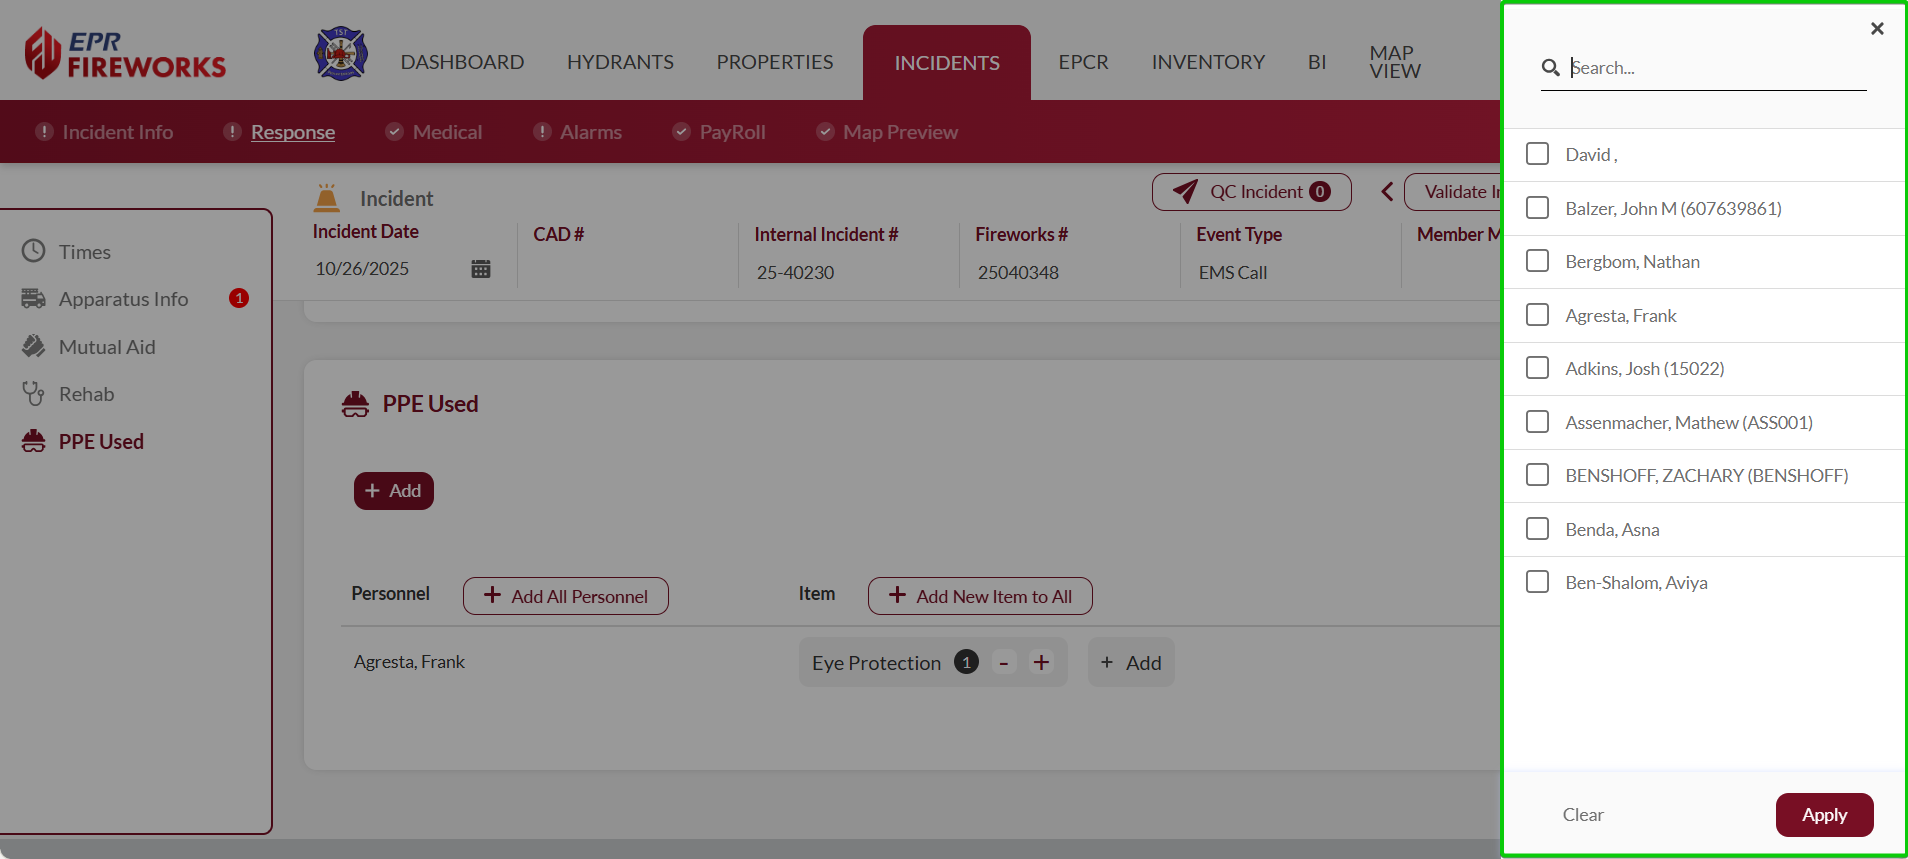
When done, click Apply.
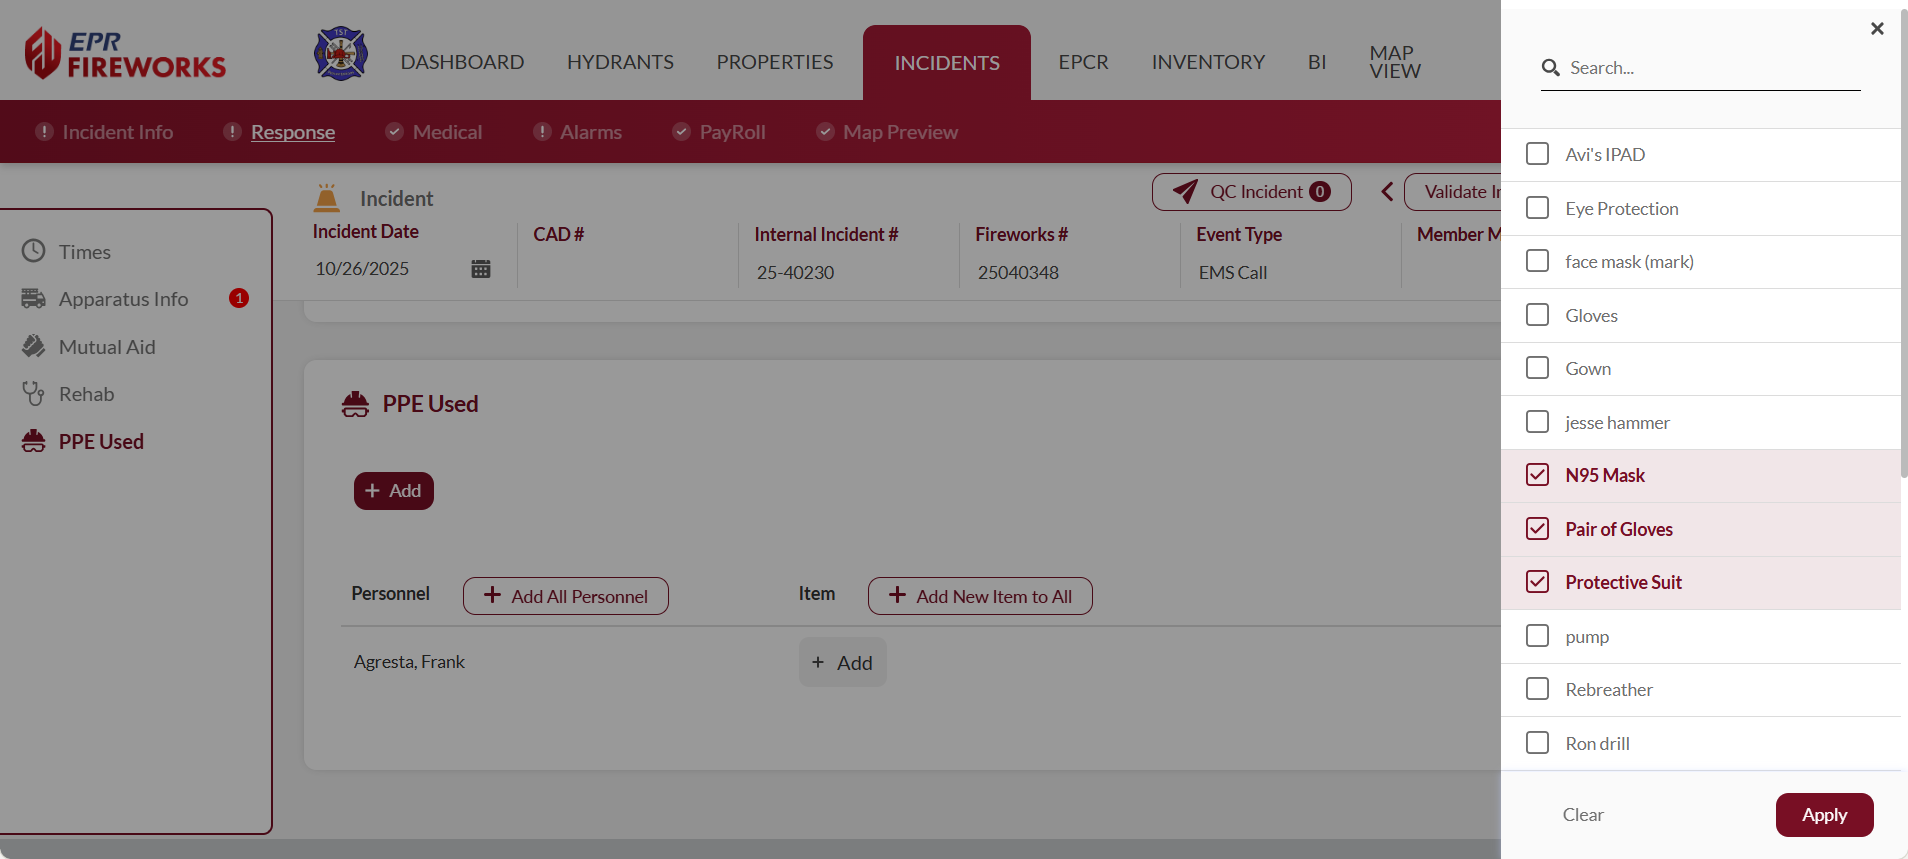
Add PPE items:
In the Item column, click Add.

Select the item from the sidebar.
Indicate quantities.

Repeat steps 3a-3c for all used items.
Repeat this procedure for all participating staff members.
Quick Actions
Adding Multiple Items to All Personnel
You can add items to all listed staff members:
Click Add New Item to All, and then
Select all applicable items from the sidebar.
Indicate quantities.
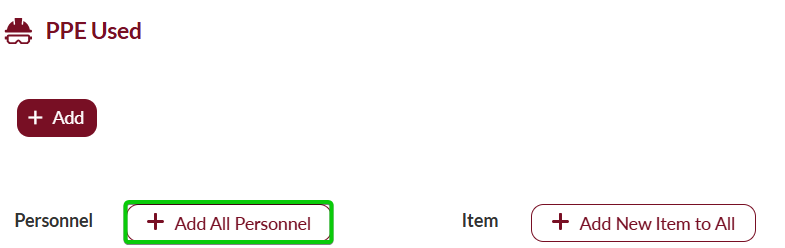
Adding All Staff Members
If all participating personnel used the same PPE items, you can add all staff members in bulk:
Click Add All Personnel.
Select all items used by all staff members.
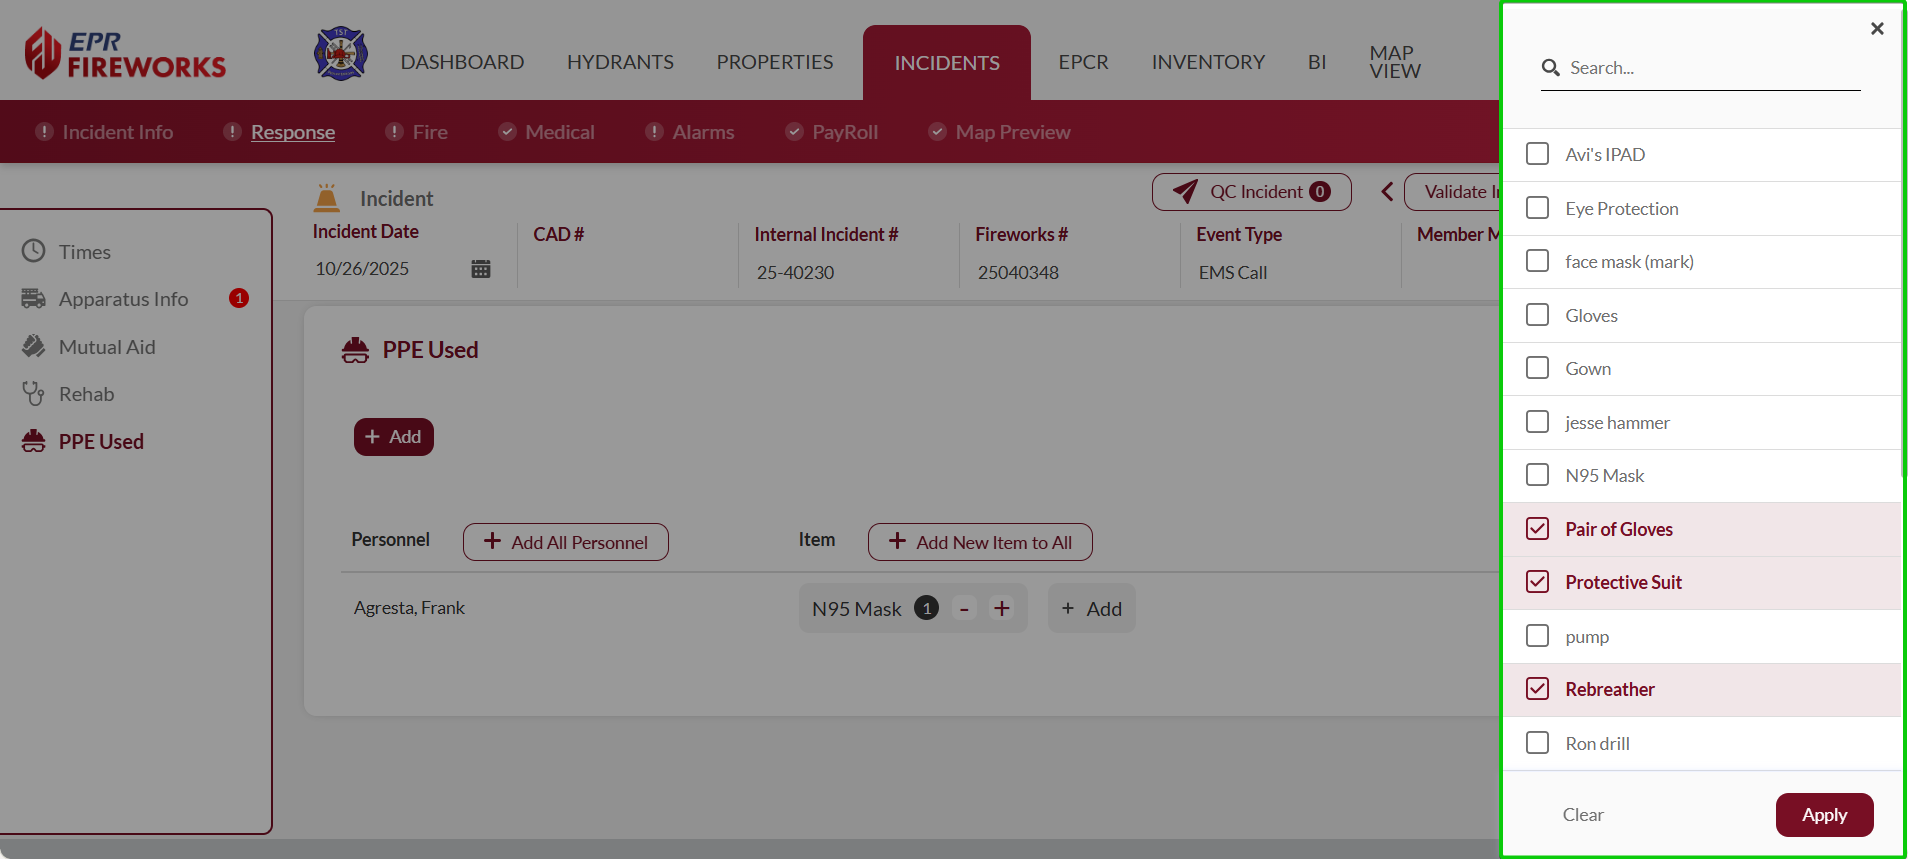
Click Apply.