
Quick Actions
Overview
Document patient treatments and interventions during active field operations using the Quick Actions modal. Quick Actions provides rapid-access buttons for medications, procedures, and interventions organized by clinical presentation, automatically timestamping all selections for accurate chronological documentation.
Quick Actions serves as the foundation of the Rapid Field Response workflow: Quick Actions → Critical Fields → Checklists → Scenarios → Complete ePCR documentation.
Before You Start
Active patient record: Quick Actions requires an open ePCR for the current incident.
Opening Quick Actions
Click the waveform icon in the toolbar at the top of the patient record.

Result: The Quick Actions modal opens, displaying four primary category tabs (All, ACS, Cardiac Arrest, Respiratory) with color-coded quick-select buttons.
Selecting Items from Quick Actions
Click the appropriate category tab for your patient's condition.
Click one or more quick-select buttons to add items to the Timeline.
Close the modal by clicking the X in the top right corner.
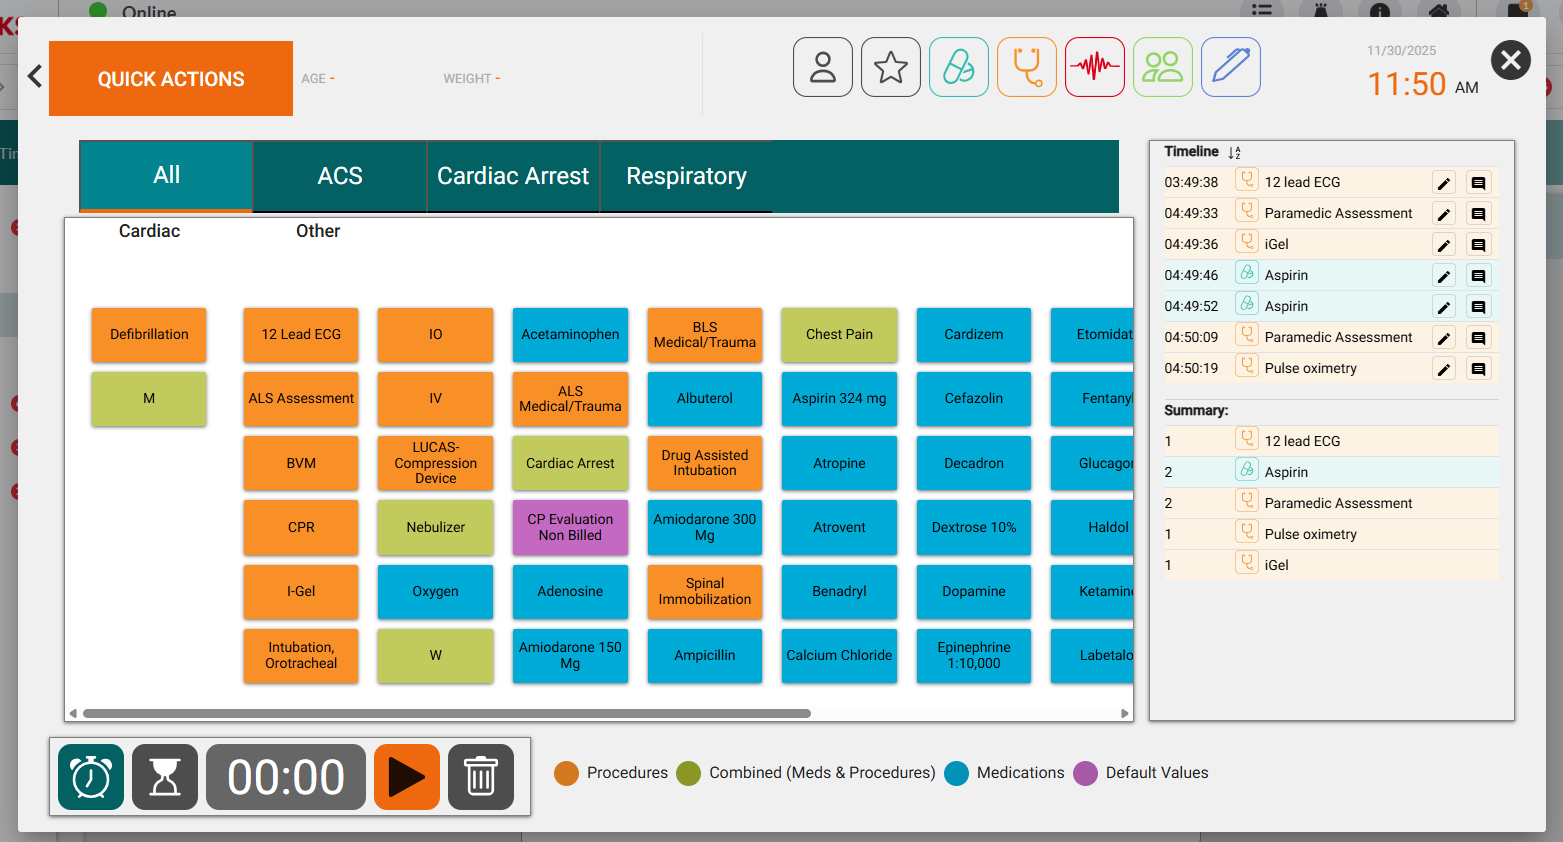
Result: Selected items appear in the Timeline panel with automatic timestamps and sync to connected devices within 30 seconds.
Category Selection Guide
Category | Clinical Use |
|---|---|
All | General interventions across all presentations |
ACS | Acute coronary syndrome and chest pain protocols |
Cardiac Arrest | Resuscitation medications and procedures |
Respiratory | Airway and breathing interventions |
Using Quick Actions Toolbar Icons
Access specialized quick-entry functions for comprehensive field documentation.

Icon | Function | Opens |
|---|---|---|
 | Patient Information | Edit Patient Info modal |
 | Critical Fields | Opens the Critical Fields modal |
 | Quick Medications | Alphabetized medication list with presets |
 | Quick Procedures | Alphabetized procedure list with presets |
 | Quick Vitals | Vital signs entry with device import |
 | Quick Crew | Crew member assignment and roles |
 | Quick Signatures | Preset and standard signature options |
Using Quick Signatures
Document signature capture for procedures, medications, or patient interactions.
Click the Signature Icon (
) in the Quick Actions toolbar.Select a preset signature button if applicable.
For standard signatures, select Signature Reason from the dropdown.
Click Save Signature.
Result: Signature timestamps and populates the Signatures tab with signatory information.
Using the Resuscitation Timer
Track time intervals during cardiac arrest for accurate CPR quality documentation.

Click the play button (▶) in the time control bar.
Document interventions as the timer runs.
Click the play button again to stop the timer.
Result: The timer displays elapsed time and enables interval-based documentation for resuscitation events.
Editing Timeline Entries
Add detailed documentation to items added via Quick Actions.
Locate the entry in the Timeline panel on the right side of the Quick Actions modal.

Click the edit icon (pencil) next to the Timeline entry.
Complete the Procedure Details form, including date/time, complications, crew member, success status, and additional fields.
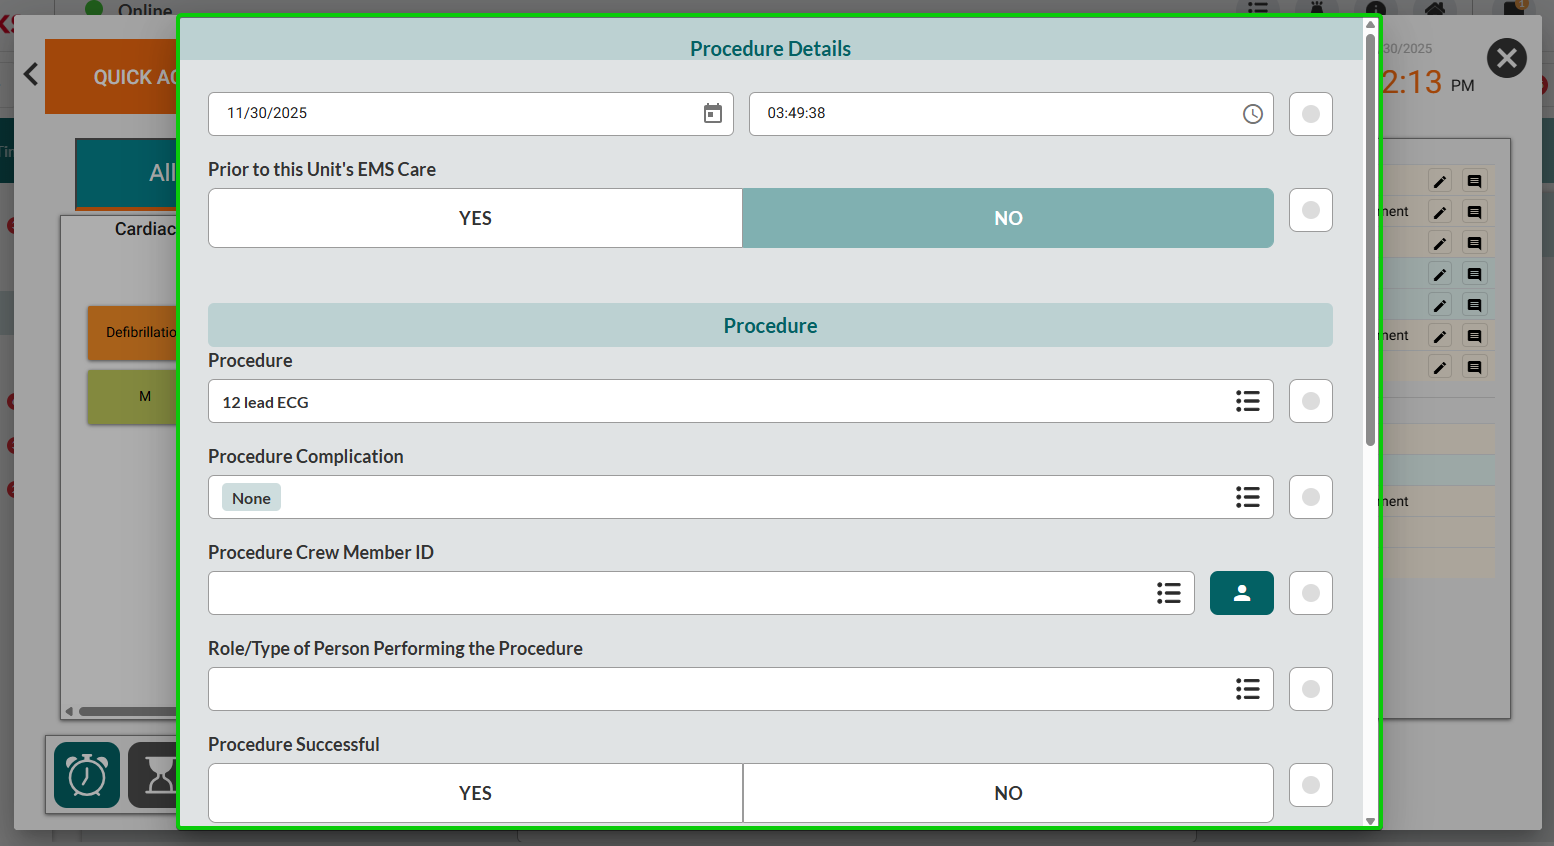
Close the form to save changes
Result: The Timeline entry is updated with complete documentation and populates the corresponding fields throughout the ePCR.
Deleting Timeline Entries
Remove incorrect or duplicate entries from the documentation timeline.
Locate the entry in the Timeline panel.
Click the trash icon next to the Timeline entry.
Confirm deletion when prompted.
Result: The entry removes from the Timeline and does not populate ePCR fields.
See Also
Critical Fields - Required ePCR submission fields
Checklists- Protocol-based verification
Scenarios- Call type workflows